Microsoft Teams is one of the most popular meeting and collaboration tools on the market, making it a go-to for many businesses. It’s frequently gaining new features to help teams work together, including the ability to enable transcription in meetings in real time.
Automatic meeting transcriptions help with note-taking and allow users to search for specific questions or topics more quickly. So that just leaves one question: how do you enable transcriptions in Microsoft Teams?
We’ve created this step-by-step guide to help you get started.
3-Step Instructions for Enabling Transcription
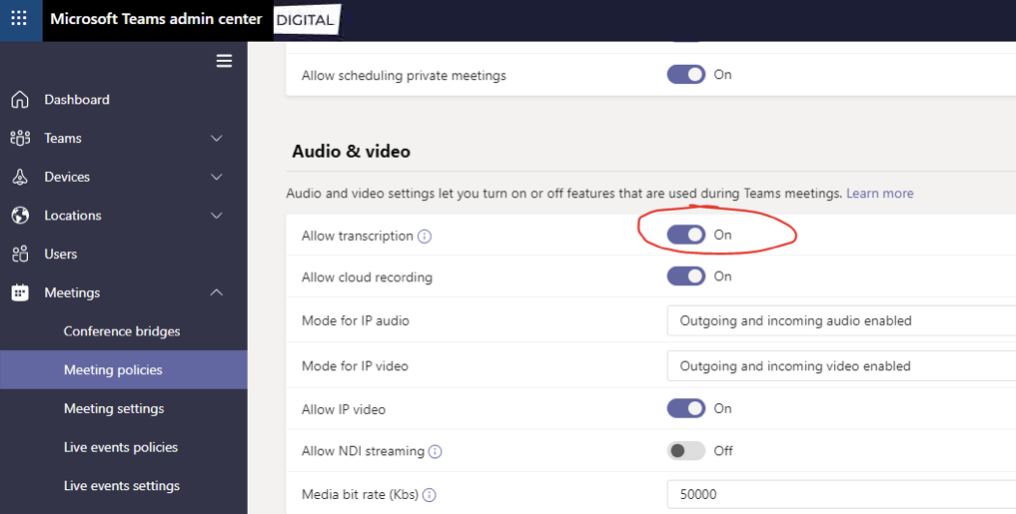
You can enable transcriptions from your Microsoft Teams Admin Center or the PowerShell command centre. To enable transcriptions from the Admin Center, just follow these three steps:
- Go to the admin account of your Microsoft Teams subscription.
- Go to Meetings → Meeting policies, then scroll down to Audio & video.
- Toggle on “Allow transcription.”
And that’s it—you now have transcriptions turned on for your team. From there, you can also customize your settings, such as:
- Enabling cloud recording,
- Selecting a transcription storage destination (an average one-hour meeting takes up around 400MB between the recording and transcript, so make sure you have enough storage space),
- Allowing transcriptions on a per-organizer or per-user basis.
Depending on your needs, you can enable transcriptions on a per-organizer or per-user basis.
In addition, when enabling transcriptions, you can also enable real-time captions. This displays the transcript as recorded during the call, adding captions to the conversation as participants speak.
Note that transcriptions and closed captions are currently available in the language you have set in your spoken language setting. Transcripts and live captions will not translate into different languages during the call.
Enable Transcription with PowerShell
You can also set up transcriptions using PowerShell commands. Simply go to the TeamsMeetingPolicy environment and change the setting to AllowTranscription. From there, you can give all your users transcriptions as part of the Global policy change.
If users have their own assigned policy, they won’t be a part of the Global policy. Admins can adjust this by using a cmdlet to remove policy assignments.
PowerShell also lets you set how many users can transcribe meetings, whether it’s all of them, most of them, or a select few.
You can also find instructions for configuring PowerShell options in the Microsoft documentation for Teams admins.
Starting/Stopping Transcription During a Call
If your transcriptions aren’t set to start automatically, they can still be launched during a meeting. This is an even more straightforward process:
- Go to the meeting controls and select More actions.
- Click on Start transcription.
Stopping the transcriptions is done through the exact same steps, and transcriptions will also automatically end when all participants leave the meeting.
Accessing Your Transcripts
Once a meeting is over, the transcript and recording are saved to your selected destination. The files are all classified as tenant-only content, which means admins will have access to them even if the person who initially hosted the meeting leaves the company.
Meeting participants can access the transcripts in the meeting event Microsoft Teams calendar, which are saved as .docx or .vtt files. Participants can download the transcript in three simple steps:
- Go to the Calendar in Teams
- Open the meeting event and go to Recordings & Transcripts
- Click the Download button on the top of the page and choose the file type as which to save it.
Enabling and saving transcripts on Microsoft Teams is a simple task, and transcripts make it easy to access notes and search records from your meetings. Now that you know how it’s done try turning your transcripts on for your next meeting.
from UC Today https://ift.tt/w2FD0Qv


0 Comments